
Difficulty
Moderate
Steps
5
Time Required
00:30:00

User-Contributed Guide
This guide is not managed by the site's staff.
Quiz
0
-
-
Pt100: Any two wire pt100 thermistor will do, including ones from e3d and Trianglelab
-
MAX31865 Board: You will need a Adafruit (or clone) MAX31865 amp board. You can buy the original here, or just search for a cheaper clone.
-
Dupont Jumper Cables: We will need 6 of them
-
-
-
Solder the pin header & the terminal blocks (obvious enough)
-
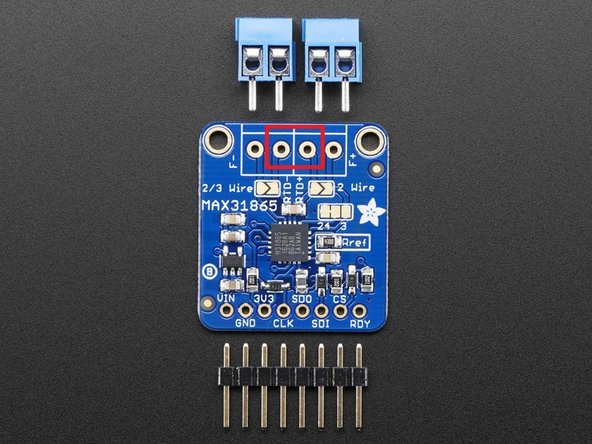
Bridge the pads marked with 2 wire (shown in picture) with solder.
-
-
-
Wire the PT100 wires into the center terminals (Picture 1)
-
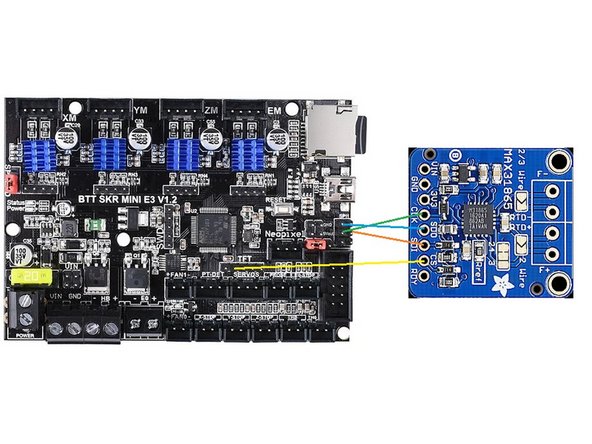
Wire VIN to 5V and GND to Ground. Any free 5V and Gnd will do, this guide will use the SPI header for cleaner wiring. (Picture 2)
-
-
-
This is the most confusing step, triple check to make sure you have the wires in the correct places.
-
We will be taking MISO, MOSI, and SCK from the SPI1 header. CS will be taken from the TFT header. (Image 1)
-
Pin Mapping
-
SKR > MAX31865
-
MISO > SDO
-
SCK>CLK
-
MOSI>SDI
-
RX0 (TFT Header)>CS
-
-
-
Edit your printer.cfg file. You can SSH into your RPi and use nano to edit (tutorial)
-
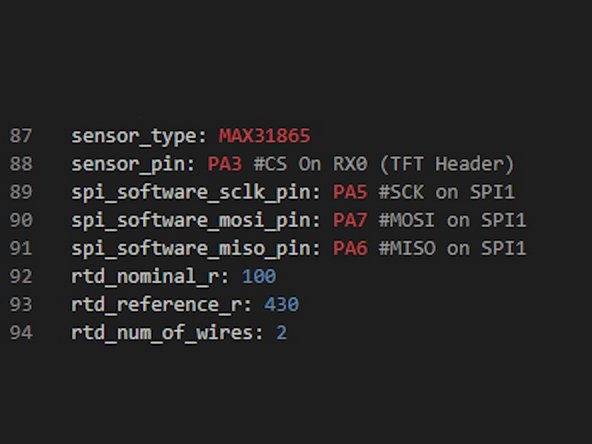
Under [extruder] insert these lines
-
sensor_type: MAX31865 sensor_pin: PA3 #CS On RX0 (TFT Header) spi_software_sclk_pin: PA5 #SCK on SPI1 spi_software_mosi_pin: PA7 #MOSI on SPI1 spi_software_miso_pin: PA6 #MISO on SPI1 rtd_nominal_r: 100 rtd_reference_r: 430 rtd_num_of_wires: 2
-
Save your changes by typing CTRL+X, Y, [ENTER]. Send FIRMWARE_RESTART from the console in Octoprint and test! It should work.
-


Cancel: I did not complete this guide.
One other person completed this guide.
2 Comments
Very good description but I get an error.
I do all what you explain in your description the error is:
Klipper meldet: ERROR
mcu 'mcu': Unable to connect Once the underlying issue is corrected, use the "FIRMWARE_RESTART" command to reset the firmware, reload the config, and restart the host software. Error configuring printer
whats the problem if you know an issue pls contact me!!!
if needed i can send you my klippy log
Thanks
Best Regards
Gordon Lehmann
Gordon Lehmann - Resolved on Release Reply