
Introduction
These instructions assume the software will run on a Raspberry Pi computer in conjunction with OctoPrint. It is recommended that a Raspberry Pi 2 or Raspberry Pi 3 computer be used as the host machine
Tools
No tools specified.
Parts
-
-
Start by installing OctoPi on the Raspberry Pi computer. Use OctoPi v0.16.0 or later - see the octopi releases for release information. One should verify that OctoPi boots and that the OctoPrint web server works. After connecting to the OctoPrint web page, follow the prompt to upgrade OctoPrint to v1.3.12 or later.
-
After installing OctoPi and upgrading OctoPrint, it will be necessary to ssh into the target machine to run a handful of system commands. There are free ssh clients available for other desktops (eg, PuTTY). Use the ssh utility to connect to the Raspberry Pi (ssh pi@octopi -- password is "raspberry") and run the following commands:
-
git clone https://github.com/KevinOConnor/klipper/
-
./klipper/scripts/install-octopi.sh
-
-
-
To compile the micro-controller code, start by running these commands on the Raspberry Pi:
-
cd ~/klipper/
-
make menuconfig
-
Select the appropriate micro-controller and review any other options provided. Once configured, run:
-
make
-
It is necessary to determine the serial port connected to the micro-controller. For micro-controllers that connect via USB, run the following:
-
ls /dev/serial/by-id/*
-
It should report something similar to the following: /dev/serial/by-id/usb-1a86_USB2.0-Serial-if00-port0
-
-
-
It's common for each printer to have its own unique serial port name. This unique name will be used when flashing the micro-controller. It's possible there may be multiple lines in the above output - if so, choose the line corresponding to the micro-controller (see the FAQ for more information).
-
For common micro-controllers, the code can be flashed with something similar to:
-
sudo service klipper stop
-
make flash FLASH_DEVICE=/dev/serial/by-id/usb-1a86_USB2.0-Serial-if00-port0
-
sudo service klipper start
-
Be sure to update the FLASH_DEVICE with the printer's unique serial port name. When flashing for the first time, make sure that OctoPrint is not connected directly to the printer (from the OctoPrint web page, under the "Connection" section, click "Disconnect").
-
-
-
The OctoPrint web server needs to be configured to communicate with the Klipper host software. Using a web browser, login to the OctoPrint web page and then configure the following items:
-
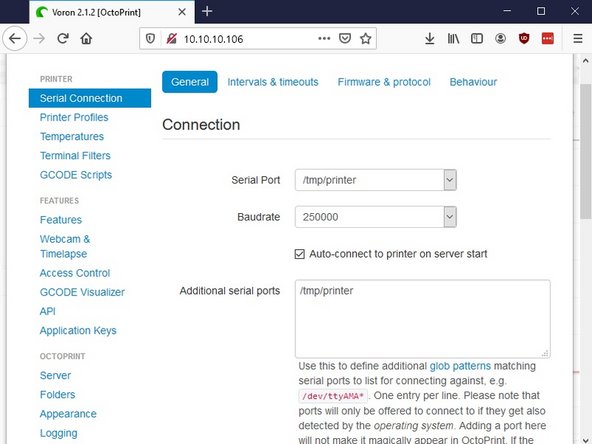
Navigate to the Settings tab (the wrench icon at the top of the page). Under "Serial Connection" in "Additional serial ports" add "/tmp/printer". Then click "Save".
-
Enter the Settings tab again and under "Serial Connection" change the "Serial Port" setting to "/tmp/printer".
-
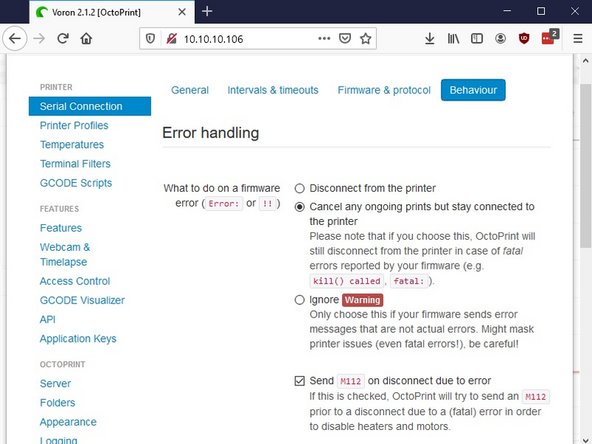
In the Settings tab, navigate to the "Behavior" sub-tab and select the "Cancel any ongoing prints but stay connected to the printer" option. Click "Save".
-
From the main page, under the "Connection" section (at the top left of the page) make sure the "Serial Port" is set to "/tmp/printer" and click "Connect". (If "/tmp/printer" is not an available selection then try reloading the page.)
-
Once connected, navigate to the "Terminal" tab and type "status" (without the quotes) into the command entry box and click "Send". The terminal window will likely report there is an error opening the config file - that means OctoPrint is successfully communicating with Klipper. Proceed to the next section.
-
-
-
The Klipper configuration is stored in a text file on the Raspberry Pi. Take a look at the example config files in the config directory. The example.cfg file contains documentation on command parameters and it can also be used as an initial config file template. However, for most printers, one of the other config files may be a more concise starting point.
-
Copy the Voron config file for your specific printer spec to the Raspberry Pi. You can use Nano or WinSCP. Whatever you feel more comfortable with.
-
The location of the config file is /home/pi/printer.cfg
-
-
-
Klipper reports error messages via the OctoPrint terminal tab. The "status" command can be used to re-report error messages. The default Klipper startup script also places a log in /tmp/klippy.log which provides more detailed information.
-
In addition to common g-code commands, Klipper supports a few extended commands - "status" and "restart" are examples of these commands. Use the "help" command to get a list of other extended commands.
-
After Klipper reports that the printer is ready go on to the config check document to perform some basic checks on the pin definitions in the config file.
-


Cancel: I did not complete this guide.
One other person completed this guide.
