Difficulty
Moderate
Steps
17
Time Required
- Preflight Checklist 17 steps

In Progress
This guide is currently being written. Reload periodically to see the latest changes.

User-Contributed Guide
This guide is not managed by the site's staff.
Quiz
0
-
-
Overall, using one of the stock configurations from the Voron Github https://github.com/VoronDesign/Voron-2 is the best starting place. The following items will need to be verified and/or updated as part of initial Firmware/running checks.
-
Note: When first powering up your printer immediately check if your hotend and bed heaters are staying cold. If either one of them is heating on its own immediately power down your printer to prevent damage to the printer and its surroundings.
-
-
-
Set all 3 jumpers for each driver to enable 1/16 microstepping if using RAMPS Video here
-
-
-
USB ports - make sure both USB serial lines are updated with the correct USB port of that MCU.
-
-
-
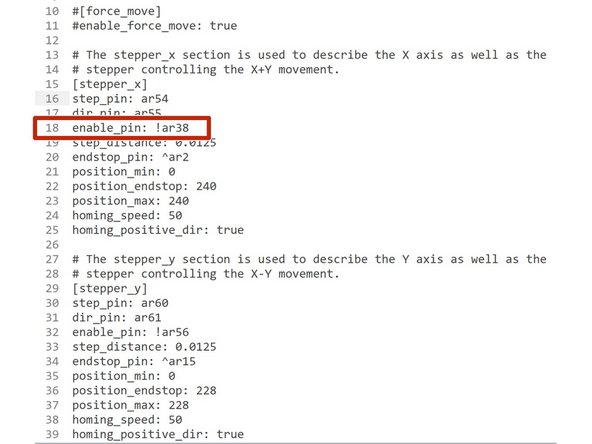
Motor Pin directions - you'll have to have the printer up and use OctoPrint to accomplish this. Use the jog controls in the terminal to make sure motors run in the expected direction. If a motor moves in the wrong direction, add a ! to the enable_pin for that motor.
-
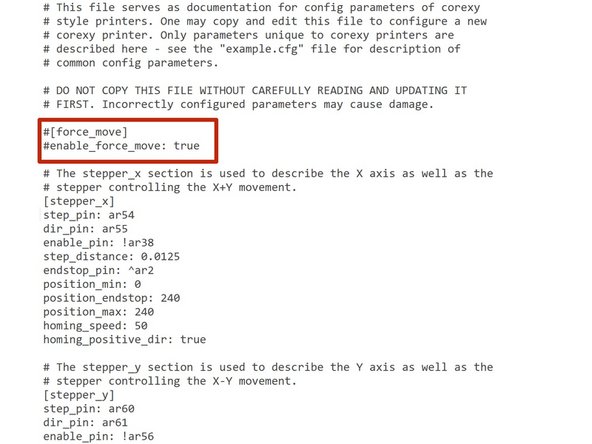
Refer to Voron Klipper for adjustments to X/Y. Note that Klipper won't let you move an axis without homing, so you'll have to tell it to home, watch it move, and quickly cut power if it goes the wrong direction. Alternatively, you can add a couple lines to your config (see image).
-
Please note the highlighted lines in the image on the left are 'commented out' by having the '#' symbol at the start of the line. To make these lines active delete these characters.
-
-
-
Make sure that your homing is set to max for both X and Y.
-
Endstop positions - make sure the position_min, position_max, and position_endstop are updated for X and Y so that X0, Y0 matches the front left corner of the bed. You should be able to home X and Y, then do a G1 X0 Y0 and have it end up exactly at the front left corner. Adjust until this is doable.
-
Verify and if needed update the position of the FSR specified in the homing_override .
-
See Voron Klipper for details.
-
-
-
X moves to max, triggers the switch/Hall sensor, moves back a bit, and slowly triggers again.
-
Y does the same thing (toolhead should move to back of printer and trigger against the right rear Z mount).
-
Toolhead should move to the same XY location as the FSR pin (nozzle should strike center of pin reliably)
-
Toolhead will move down and strike FSR pin twice as with X and Y then move slightly up and rest. Adjust the FSR pin location to be exactly in the center of the nozzle. You will likely have to have a finger on the power switch as it homes the first few times until the configured pin position is closer to reality.
-
This is a good time to make sure the top of the FSR pin sits flush with the bed, or ideally a tiny bit below it.
-
Make sure the pin is not more than 1mm above the bed or your probe will crash into the pin during prints that pass the probe over the it.
-
-
-
Measure from the homed X and Y to the closest stepper motor, use that X and Y as one Gantry Corner.
-
Use G1 X0 Y0 Z20 to move to the opposite corner.
-
Measure the nearest stepper to this corner, and use negative X and Y values for this corner.
-
See Voron Klipper for details.
-
-
-
Use points that are within the confines of your bed. The probe should be able to sense the bed at these locations and ideally have ~10+mm of bed around the probe at these points.
-
-
-
While the printer is on, tap the microswitches or bring a magnet near the Hall sensor if you used one, and make sure both endstops trigger in the firmware.
-
Use QUERY_ENDSTOPS to watch the status change. They should be "triggered" only when you're pushing them/holding the magnet up to them. If they are the opposite, add a ! to the enable pin for the offending endstop. (See line 18 on the image to the left for the use of the '!' character)
-
-
-
FSR is tested identically to the X/Y Endstops. Check the endstop query output, make sure it triggers when you lightly press on the FSR pin. If the FSR is lit after the release, adjust the potentiometer until it stops being lit. Also check if the shaft is free to move around in this casing.
-
-
-
Z Probe - the stock Z probe is a Normally-Closed probe. As such, it should light up normally, and if metal is brought near the probe, the light should dim/go away. Similarly, a QUERY_PROBE command should return "triggered" only when a piece of metal (ideally the bed) is near.
-
-
-
When OctoPrint is on and connected, you should see correct room temperatures on both the Heatbed and Toolhead. If the temperature does not match the room temperature verify your sensor configuration before continuing.
-
Set the temperature to ABS printing temperatures for both. The hotend fan should turn on when it is above 75° or if you set the target temperature above 75°.
-
Heatsoak the printer - set it to a printing temp, let it sit for a half hour .
-
You may need to PID tune to complete this step without errors.
-
-
-
This should not need to be done for the Heatbed. It's a giant slab of aluminum, and PID tuning would not improve your results.
-
For the hotend, turn the print cooling fans on 100% and make sure the hotend fan is also running during PID tuning. This will avoid "heater not heating fast enough" errors later. Run a PID tune, take the values from the terminal output of it, and replace the hotend PID values in the config.
-
Save and restart.
-
-
-
Run a QUAD_GANTRY_LEVEL.
-
It should probe the points you set and start adjusting to be in plane with your bed.
-
You want to make sure it levels continuously until it reaches a tolerance of <0.01mm, ideally <0.0075mm. It may take several tries the first time you run the QGL.
-
If the tolerance is shown to be going up or down, check your Z belts so they aren't loose.
-
This is also a good time to make sure your Z idlers are directly perpendicular to their belts, as misaligned idlers can cause false "readings" for the QGL process.
-
-
-
Issue the command Z_ENDSTOP_CALIBRATE,
-
Move the nozzle with TESTZ Z=0 where Z=+/-value moves up and down.
-
Use a paper or metal gauge of 0.10 mm thick to slide under this nozzle until it gets nearly snug.
-
You can then issue Z=-0.1 to check that nozzle is touching the bed.
-
Issue command ACCEPT
-
Issue SAVE_CONFIG to save to your config or you manually edit the config with the value from ACCEPT.
-
If the position_endstop is ~1.5 or more, the inductive probe will hit the FSR during the print. You'll have shorten this rod or adjust your slicer so pieces aren't near it.
-
-
-
Before you move the extruder, you have make sure that bowden tubing is solidly installed and have their ends straight cut and spacers are installed on the hotend and extruder.
-
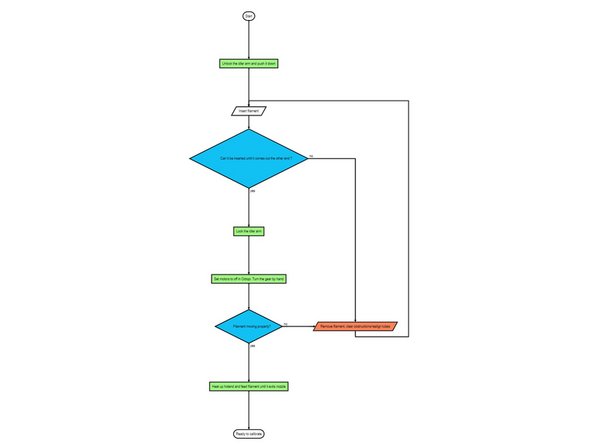
Unlock the idler then push down the idler arm.
-
Push your filament of choice on the entry side until you feel the filament has come out on other side. If it won't come out, visually check the Bowden tube alignment and correct it
-
Check for obstructions if it gets stuck and ensure the tube is lined up properly.
-
Once filament moves through tube correctly, Lock the idler arm.
-
With motors off, lightly turn the extruder and check if the filament moves as expected.
-
Heat up nozzle and use OctoPrint to load filament until it comes out of nozzle
-
Ready to move on to calibration
-