
Introduction
Extruder calibration is critical to quality print results. In order to complete calibration, you will be extruding a known length of filament from the extruder and measuring it as accurately as possible. Calipers make the job easy, but a ruler with mm divisions will work fine. Just note if you are using calipers, 1/10th mm is probably more than accurate for this purpose.
-
-
Open your printer.cfg file in your preferred method. SSH and Nano work very well for this, but WinSCP is a viable method as well.
-
Locate the [extruder] section.
-
Take note of the step_distance value. You are going to need this in later steps.
-
-
-
Remove the output bowden tube from the extruder (the one feeding the hot end). If there is filament loaded, please unload enough that you can remove the tube from the collet.
-
If you have no filament sticking out of the extruder, extrude a few mm until a short amount is sticking out of the collet.
-
Cut this clean with the collet with side cutters. I like to depress the collet with the side cutters, but whatever method you choose, ensure you measure the same way.
-
-
-
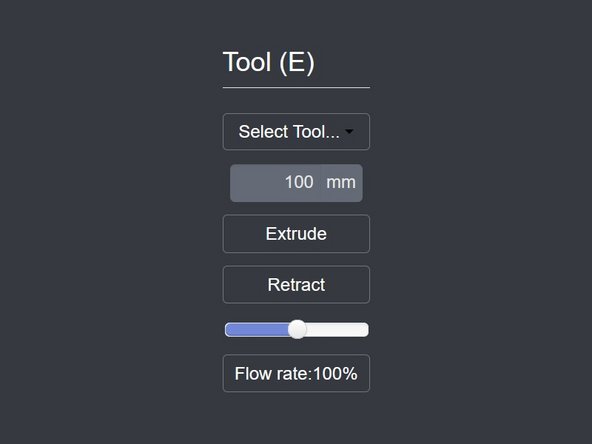
Warm up your hot end to 235C.
-
Once at temp, extrude 100mm using the Octoprint web interface.
-
-
-
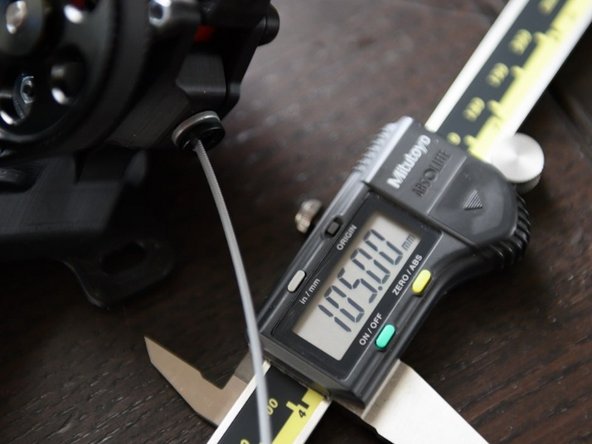
Measure the extruded filament from the extruder. It helps to flush cut this again and measure with the filament straightened out on a flat surface. If you wish to measure from the extruder, just ensure it is straight as possible during measurement.
-
Note this number. We are going to use it in the next step.
-
-
-
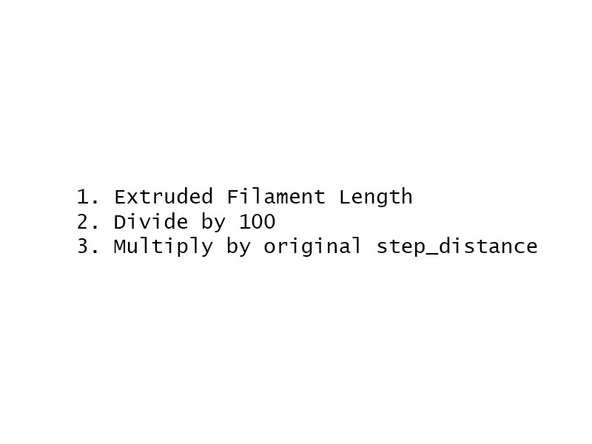
Take your measured filament length. In this example we are using 105mm.
-
Divide this number by 100. The result is 1.05
-
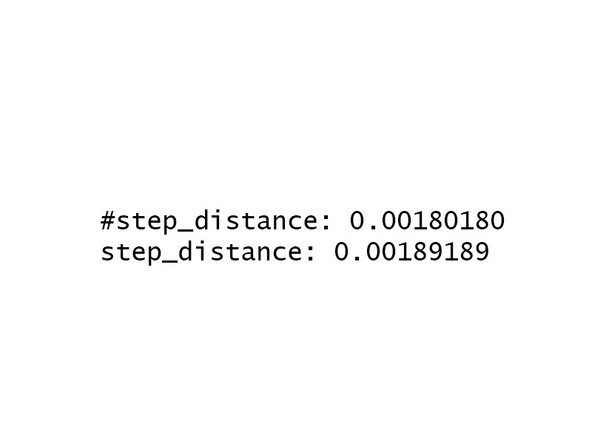
Multiply this number by the step_distance number we recorded previously. For this example, we will be using 0.00180180. The result is 0.00189189
-
This is your new step_distance value that we will update our config with in the next step. Remember, do not use these values. They are for example only.
-
For reference, larger step_distance values mean that less filament will be extruded.
-
-
-
If you have closed your printer.cfg file, please re-open it.
-
Locate the step_distance line in the [extruder] section.
-
Comment out the existing step_distance configuration by adding a # to the start of the line.
-
Copy and paste the new value into the config under the previous entry.
-
Save your config
-
Restart klipper by issuing a "FIRMWARE_RESTART" command in the OctoPrint terminal window.
-
-
-
Repeat Steps 3 - 6 until your extruded filament is within 99-101mm. It may take a few tries to get right!
-


Cancel: I did not complete this guide.
One other person completed this guide.
